Boat Dock Lift Maintenance
Although boat lifts are made of strong, durable materials, they can still be damaged by water-related issues. This includes saltwater damage to bunks, beams, cradles, and gear boxes as well as corrosion of metal parts like cables.
To minimize this type of damage, it’s best to perform regular maintenance on your Boat Dock Lift. Boat Dock Lifts Charleston SC will help ensure your investment lasts a long time.

During routine Boat Lift maintenance, it’s important to check the winch and motor for signs of damage or trouble. A simple inspection can help ensure that these key components continue to work properly for years to come.
Look for rust, dirt, or other debris that could be damaging the boat lift motor. Also, make sure the electrical connections are tight and that nothing is loose or disconnected. If you see any signs of overheating, it’s time to replace the motor or repair the existing one.
If you use your lift a lot, it’s recommended that you lubricate the (3) grease fittings and gear teeth on each flat plate winch monthly. A high temperature / marine-grade lubricant is best. Also, rinse cables and cradle beams after each use to prevent corrosion.
Most modern lifts are made of aluminum, which doesn’t corrode as easily as steel. However, it is still susceptible to water-related damage. The best way to avoid this is by keeping the lift out of the water as much as possible and rinsing it regularly.
Be sure to inspect the beams, cradles, and decking for rust, chips, or other signs of wear and tear. If you notice any of these issues, it’s important to fix them right away to avoid costly repairs in the future.
Finally, if your lift has been exposed to heavy winds or a severe storm, be sure to clear any debris that may have fallen on the boat lift. Then, if the sheave alignment is off, it’s important to realign it before operating the lift.
Once you’ve finished examining the sheave alignment and cable condition, it’s important to apply a small burst of penetrating oil on top of each cable wrapped around the winch drum. This will protect the cable from abrasion and reduce the risk of severe problems such as kinks, frays, or breaks. Additionally, it will keep moisture from clinging to the cable and sheave. Using the right lubricant can dramatically prolong the life of your lift cable.
A boat lift consists of many different parts and components, all of which need to be maintained for the system to work correctly. This includes the beams, cradles, pulleys and gearboxes. Each of these should be inspected on a regular basis to look for signs of corrosion or water damage. This will help to ensure that the lift continues to function smoothly for years to come.
The most critical component of the boat lift is the cables, which are responsible for lifting and lowering your watercraft. These cables can be damaged by salt water and should be replaced every two years or 200 up-and-down cycles, whichever comes first. During your inspection, be sure to look for any rust spots, fraying or kinks in the cable strands, which are signs that it is time to replace the cables. You should also inspect the sheave bearings to make sure that they are properly aligned. If the sheave bearings are misaligned, this can cause the cables to wear out more quickly.
It is important to rinse the lift cables after each use and regularly remove them from the water to prevent algae and debris buildup. Keeping the cables out of the water will also prolong their life and reduce the risk of corrosion and rusting. It is also recommended to lubricate the cables with a penetrating oil on a regular basis to minimize abrasion and wear and tear.
The sheave bearings on the pulleys should be lubricated as well. The lubrication should be done using the zerk grease fittings that are located on the pulleys. These should be lubricated every six months in order to keep the pulleys running smooth and minimize unnecessary wear on the cables. The lubrication will also help to minimize friction, heat and noise. It is recommended that you use a grease that is water resistant and not oily, as the latter can trap moisture inside the cable strands. It is also a good idea to use grooved aluminum cable winders, as these will help to minimize metal-on-metal abrasion and extend the life of the cables.
Boat lifts are some of the biggest investments for most dock owners and, like any other large investment, they need to be well-maintained for their maximum life expectancy. It’s important to check the lifts regularly for damage, and this is especially true during the off-season. This is when the most damage can occur, as rust and other problems often arise from prolonged exposure to water and humidity.
A visual inspection of the bunks and carpeting will reveal any holes or tears. Bunks made of wood should be checked for any rot or cracks and should also be cleaned of marine growth. Aluminum bunks are much more resistant to corrosion, but they still need to be cleaned periodically and tightened.
Whether the bunks are wood or aluminum, it’s a good idea to replace the carpeting. This will help reduce contact between the boat and the raw wood of the bunks.
It’s also a good time to make sure that the bunk boards are leveled fore and aft and that the center of gravity is properly positioned on the lift. Using the manufacturer’s guidelines as a guide, this is not difficult to do.
If the lift is going to be left out of the water for extended periods, it’s a good idea to cover it to protect it from snow and rain. This will also keep it out of the way of boats and other water-related equipment. Depending on the material of the dock, this might require the use of a heavy-duty canvas or even plastic sheeting.
When a lift is in storage, it’s a good idea to remove and safely store the battery if there is one. This will prevent it from draining and possibly corroding in the colder temperatures. It’s also a good time to check that all the electrical connections are in place and properly connected.
Finally, if the cable is equipped with sheaves, it’s a good idea to grease them. This will reduce friction between the sheaves and their mounts, which can cause them to seize up. The sheaves should also be aligned. If they aren’t, this can put a strain on the cable and increase the chance of slack or tangling during use.
As the storm-related social distancing and sheltering have begun to ease, people are trying to find ways to stay productive. For many, it means tackling the chores that they put off during normal times. For others, it means taking on the big jobs that need to be done before boating season can begin. For those who have a boat dock lift, completing a routine inspection is an important step that will help ensure the equipment is ready to use come springtime.
Start your inspection by looking at the lift’s frame. Look for signs of rust, corrosion or structural damage. Examine the welds and joints, especially those that connect the arms to the rest of the lift frame. If the lift is a vertical lift, check to make sure that all the arm pivot bolts are tight. Also, inspect the pulleys and make sure they are properly lubricated. This prevents them from wearing down due to friction.
Next, examine the electrical components of the lift. If there is any water on the electrical cables, it may indicate that they are wet and that there could be a potential shock hazard. Also, check to see that the GFCI (ground fault circuit interrupter) is working correctly. This device helps to reduce the risk of electric shock by shutting off the power to the lift when it detects current flowing along an unintended path, such as through water or a person.
Finally, check the controls for the lift to make sure they are in good working condition. If the controls are worn or cracked, consider replacing them. Finally, if you have a boat elevator lift, inspect the tracks for corrosion. Aluminum track can be particularly susceptible to galvanic corrosion, especially if they are exposed to saltwater. In order to minimize this corrosion, you can install sacrificial Zinc anodes on your lift’s tracks.
It is also a good idea to rinse the lift beams and cradle beams with fresh water after each use. This will rinse away any marine growth and salt that can cause the metal to corrode faster. It is also a good idea to keep the beams out of the water as much as possible when they are not in use, this will reduce wear from contact with the water(especially salt water), electrolysis and marine growth.
How to Clean Your Deck Without Harmful Chemicals
Deck Cleaning Summerville SC uses bleach, which is effective for fading mildew and mold stains but may damage painted surfaces. To prevent this, add one cup of powdered borax to your water and oxygen bleach solution.
Remove furniture, grills, and metal fixtures before cleaning to avoid scratching or gouging the surface. Avoid using a power washer unless the directions recommend keeping the nozzle at least six inches from the wood.

If you can buy non-toxic dish soap that is free of ammonia, this can make a simple but effective deck cleaner. This cleaning solution is gentle enough to clean composite decks but effective against mildew, mold, algae, fungus, and dirt build-up. This type of cleaner also works as a pre-treatment for stain removal, as it helps to break down the chemical bonds that hold inks and dyes in place. This treatment is not intended as a substitute for regular, thorough cleaning, however. Sweeping daily and regularly brushing the gaps between deck boards can help prevent mold growth.
Powdered oxygen bleach (such as OxiClean) can also work to clean and brighten a deck. This product works well against mildew, mold, and fungus but is not as effective against oil stains. It does, however, help to fade graying wood. Before applying, test the product on an inconspicuous area of the deck. It is recommended to use a specialized deck scrub brush or long-handled stiff brush broom.
Put two gallons of warm water into a plastic bucket large enough for the head of your scrub brush to fit in. Add 2 cups of powdered oxygen bleach, such as OxiClean, which can be purchased in the laundry detergent aisle at your grocery store. The product is gentler than liquid chlorine bleach and works as a cleaner, deodorizer, and stain remover. Stir gently until the bleach completely dissolves. Mix in 1/4 cup of liquid dish soap and stir just enough to disperse it throughout the solution.
This cleaner is effective on most common deck materials. Still, it is not suitable for use with power washers, as it may damage the surface. It is also not a good choice for decks surrounded by bushes or plants, as it will likely harm them.
Another option is to use trisodium phosphate or TSP. This product is effective against grease stains, but it can be harsh on the deck’s surface and adjacent grass, so you’ll want to take extra care to protect the surrounding greenery. If you choose to use TSP, follow all manufacturers’ instructions.
Oxygen bleach is a natural cleaner and disinfectant that’s safe to use on wood. It’s gentle on stained decks and helps to remove dirt stains, oil stains, and mildew. It also works well to brighten and restore faded surfaces. It’s a great alternative to chlorine bleach because it doesn’t leave behind the harsh chemical fumes that can harm the environment, children, and pets. It’s available in powder form, and you can mix it with water according to the instructions on the package.
Before using any cleaning solution on a treated wood deck, it’s important to ensure the surface is dry. If you apply a cleaner to wet wood, it won’t soak in and won’t be able to do its job of deep cleaning the wood. It’s also best to wear rubber gloves and goggles when working with oxygen bleach since it is still bleach. If you have plants near your deck, water them beforehand or cover them with a tarp to protect them from the solution.
To clean your deck with oxygen bleach, sweep to loosen up dirt and debris. Then, spray the deck with a garden hose to get it wet. This will help to dislodge stuck-on dirt and allow the cleaning solution to penetrate deeper into the wood. Once the deck is wet, you can scrub it with a stiff brush. Make sure to pay special attention to areas with a lot of mildew or mold stains. After you’ve cleaned, let the deck sit for 30-60 minutes so that the oxygen bleach has time to work.
After the deck has sat for some time, you can rinse it with a garden hose to remove any remaining traces of the cleaning solution. Be careful not to splash the cleaner onto your house or nearby plants. After rinsing, you can inspect the deck for splintered boards or rough spots that need to be sanded down or patched.
While it is possible to do this project on your own, if you have a very large or very dirty deck, it’s usually best to hire a professional deck cleaning service. They will have the equipment and the knowledge to quickly and thoroughly clean your deck and leave it looking like new. They will also know which cleaning solutions are safe for your preservative-treated deck material and which ones to avoid.
Vinegar is a powerful natural cleaner used alone or as part of a larger deck cleaning solution. It is effective at removing mildew and mold, breaking down food and beverage stains, and dissolving mineral deposits and water stains. It is also safe for various deck materials, including wood and composite. It is an affordable option for homeowners looking to avoid the expense of purchasing or making their special deck cleaning solutions.
A vinegar solution is less effective at addressing oil-based stains or rust. Still, it is an excellent choice for general grime and dirt that builds up on the surface of a wooden deck. The acidity of the vinegar can help to break down stains and discoloration on the deck’s surface. In contrast, the baking soda’s mild abrasiveness helps to scrub away any remaining debris. This simple homemade deck cleaner is safe for most types of wood, including cedar, redwood, pine, and pressure-treated lumber.
Oxygen bleach is an effective alternative to chlorine bleach for cleaning wood decks and other outdoor surfaces. It is available in various forms, from powdered oxygen laundry cleaner to liquid oxygen bleach. When combined with warm water, this solution is a powerful mildew and moss killer effective at tackling ground dirt and grease stains. This solution is also safe for most types of wood and can be safely used on composite, PVC, concrete, and brick decks.
Before using a bleach-based cleaner, it is important to allow the deck to dry completely. This will prevent the bleach ingredients from reacting with other treatments, such as a stain or sealer. It is also important to ensure that any plants, grass, or foliage surrounding the deck are protected from the bleach.
Besides the cleaning, as mentioned earlier, several other DIY deck cleaners can be found at home or in stores. Trisodium phosphate is an inexpensive, heavy-duty algae killer effective on a wide range of wood and outdoor surfaces. Per WIN Home Inspection, this chemical is also effective in reviving flaky areas of treated wood. This heavy-duty product can be combined with bleach or a powdered oxygen cleaner to create a powerful and effective deck-cleaning solution.
If you’re not fond of harsh chemicals or prefer to go natural when cleaning your deck, you can still do the job with safe, homemade solutions. Several recipes, which can be used on wood and composite decks, use household ingredients such as baking soda, vinegar, and oxygen bleach. However, before attempting any cleaning solution, ensure the product is appropriate for your composite type and follow specific instructions to avoid damage or discoloration. Then, start by removing all furniture and planters, sweeping the area thoroughly, and addressing any visible stains or mildew growth. Finally, rinse the entire deck using a garden hose with a spray nozzle or a pressure washer on a low setting.
Before you apply any cleaning solution, it’s a good idea to protect any surrounding plants and greenery with a tarp. This will help prevent any accidental chemical or water spills from harming your plants, and it also makes it easier to clean up the cleaning solution once you’re finished.
Mixing baking soda, oxalic acid, and dish soap is another common DIY deck cleaner. Mix equal parts oxalic acid powder and liquid dish soap, add water, and stir until the solution is foamy. Pour the mixture onto your deck, scrub with a stiff-bristled brush, and rinse it clean. This solution is especially effective for removing stubborn mildew stains.
Vinegar is a versatile cleaning agent that not only removes stains and mildew but also helps keep ants away from your deck, and it’s a great degreaser. For a natural way to get rid of grease spots after backyard barbecues, try using powdered laundry detergent as a substitute for cleaning products. Sprinkle the detergent directly onto the spot, wait a few minutes, then scrub with a brush and rinse.
Lastly, you can also combine oxalic acid with oxygen bleach and dish soap to create an effective deck cleaner that will work on both wood and composite materials. This solution is particularly effective in removing mildew, mold, and algae. To make this solution, add a cup of oxalic acid powder to a bucket of warm water, then stir in several squirts of liquid dish soap until it’s foamy. Use a brush dipped in the mixture to scrub your deck, then rinse it thoroughly with a hose.
Choosing Roofing For Your Home
A roof covers the top of a house or other building and protects against rain, snow, sunlight, extremes of temperature, and wind. It also carries water away from walls and foundations to minimize erosion and damage.

Roofs are constructed of a variety of materials and are supported by rafters or pre-fabricated trusses. The most familiar part of a roof is the covering, often called shingles.
Slate is a popular choice for many homeowners thanks to its long lifespan and unique appearance. It can withstand heavy rains, snowfalls and winds, but it can also withstand fire, making it an ideal roofing material for homes in hotter climates. The material has a natural texture that complements many architectural styles and home colors, and it can be cut to fit around chimneys, dormers, valleys and other features on a roof.
While a slate roof can be expensive, it can also last for 200 years or more, saving you from the need to reroof on a regular basis. This material is also fungus-, temperature- and mold-resistant, eliminating the need for regular maintenance that comes with other types of roofing.
In order to get the most out of a slate roof, it’s important to hire a professional for installation. Roofing specialists are familiar with the challenges of working with this type of roofing and will be able to avoid common mistakes like misaligning or mixing new tiles with pre-existing ones. They will also know how to properly install slate around the edges of a roof, preventing leaks and other problems.
Because slate is such a fragile material, it’s important to hire a roofer who has experience with this type of roofing. Using inexperienced roofers can result in broken pieces and other damage to the home’s structure. Inexperienced roofers may also not know how to distribute the tiles evenly, which can create gaps and other problems.
Slate roofs are also heavy, which can require structural reinforcement in some cases. This is an additional cost that can add up quickly, especially if a home has many different levels or dormers. In addition, the contractor will likely need to remove the old shingles and underlayment before installing the slate.
Slate is a natural material, which can be environmentally unfriendly to extract and transport. It can also be difficult to recycle, meaning that the material may end up in landfills or other locations where it could cause harm to wildlife and the environment. Because of this, it’s important to choose a roofer who uses environmentally-friendly methods for collecting and transporting their materials.
Asphalt
Asphalt shingles are the most popular roofing option for homeowners and commercial buildings due to their cost effectiveness, ease of installation and long lifespan. They also come in a variety of color and style options so you can find the perfect match to your home’s aesthetic. However, despite their popularity, there are some important things you need to keep in mind when choosing an asphalt roof.
First, understand the different types of asphalt shingle. The three main options are 3-tab, architectural and luxury. 3-tab shingles are simple, flat and uniform in size and shape. They are less expensive than architectural shingles, but they are not as durable or weather resistant and do not offer manufacturer’s warranties like architectural shingles.
Architectural shingles are made of multiple layers to create a more dimensional look and feel. They are more durable than three-tab shingles and can withstand heavier wind and rain, making them a good choice for homes in high-wind areas.
The second type of asphalt shingle is made from fiberglass mats that provide strength and durability. This material replaces organic mats, which were common in earlier roofing materials. These mats are then covered with layers of asphalt and granules. The granules not only give the shingle its distinctive color but they also help protect the roof from water and sun damage.
Finally, the top layer is a sealant that helps to prevent leaks. The sealant is often tinted to help it blend in with the shingles underneath.
There are also several energy-efficient asphalt shingle options available for homeowners who want to reduce their utility bills. These shingles are designed to reflect sunlight instead of absorb it, which reduces the amount of heat that is transmitted inside the house.
No matter which type of shingle you choose, it’s important to hire an experienced contractor to install your new roof. A local roofing pro will know how to properly install your shingles and follow the manufacturer’s recommendations for optimal performance. Failing to follow these guidelines can lead to a faulty roof that will allow moisture to damage the structure of your home.
Metal
Metal roofing has long been popular in commercial applications but has recently become popular for residential use. It’s available in a wide range of styles to fit any architectural design. It also is very energy efficient, reflecting radiant heat rather than absorbing it and keeping your home cooler in summer. It can even help lower your energy bills in winter by keeping your house warmer.
Metal roofs are very durable and resistant to fire. They also withstand high wind speeds and impact from hail. Most manufacturers offer 50-year warranties and some offer lifetime, non-prorated warranties. They last about twice as long as asphalt shingles, saving you on re-roofing costs. They are very light, making it easier to install and reducing the load on your structure. They can be installed over existing shingles, but check with your local building code and the manufacturer’s specifications before doing so.
PROS: Metal roofs are versatile and stylish. They come in a variety of colors, shapes, and thicknesses. Some are textured to look like traditional shingles. Some feature solar reflectance coatings, which keep the roof cooler. Many of them are galvanized, or made with a zinc and aluminum alloy, which adds strength and durability. Some are insulated, which helps reduce heating and cooling costs. They’re very affordable and can be a great investment for your home.
CONS: They can be noisy during rain and snowfall. They can also be prone to dents, especially in stamped, shingle-look panels, or in standing-seam applications. However, most of these dents can be prevented with proper installation and by using a thicker-gauge panel.
They’re not as insulating as other roofing materials, which can lead to higher energy bills in some homes. It’s important to use quality insulation if you choose this option. In addition, metals attract lightning, which can cause expensive damage to the roofing system and other areas of your house. If this is a concern, you can reduce the risk by grounding your electrical system and adding special lightning protection. However, if you live in an area with frequent lightning strikes, you may want to consider another roofing material.
Tile
Tile roofs are a beautiful alternative to asphalt shingle roofing and are available in various color options. Some types of tiles are crafted to emulate other styles, such as slate or clay. While tiles may be more expensive than shingles, they will last longer and enhance the curb appeal of your home.
Tiles are made of natural materials and are often recyclable. They also don’t require as much maintenance as shingle roofing. They are also a popular choice in warmer climates. They are durable and can withstand high-speed winds. In addition, they can help reduce energy costs in your home. The gap between the roof and tile can help block heat from entering your home in the summer.
Among the most popular types of tile are terra-cotta tiles, which have a barrel shape and can be found on Spanish or Mediterranean-style homes. They are popular in warm, dry regions because they absorb and release heat slowly. They are also fire-resistant. They’re easy to install and come in a variety of colors, including red, green, or yellow.
Another popular type of tile is concrete tile, which is made of cement, sand, and water. It’s one of the most affordable types of tile, but requires specialized skills and tools to install. It’s also important to use a quality underlayment when installing concrete tile roofs.
A copper roof is an elegant option that can add an attractive touch to your home. It’s also long-lasting and weather resistant, which helps protect your home from moisture and rust. Copper roofs can be difficult to maintain and are pricier than other types of roof tiles.
While it’s not uncommon for homeowners to prefer a certain type of roofing, you should always choose a material that will protect your home from the elements and improve its curb appeal. Additionally, it’s best to work with a professional roofer when installing any roofing. If you decide to do it yourself, be sure to wear the appropriate safety equipment and a ladder or scaffolding that is rated for your weight. Using unrated equipment could lead to injury or death.
Excavation Dangers
Excavation work is fraught with dangers that can lead to severe injury and death. These include cave-ins, inhalation hazards, lack of oxygen, underground utilities, and accidents with construction vehicles.
Trench collapse, a cave-in, is the deadliest excavation hazard. A pre-excavation assessment must be conducted, and protective systems must be installed to reduce the risk. These may include sloping, benching, and shoring. Click https://www.levelgroundexcavation.com/ to learn more.

Falls are a common excavation hazard and can seriously injure workers. The risk of falling debris or equipment can be reduced by putting up barriers and warning signs. Workers should also avoid working near moving machinery and stay clear of the edges of trenches or excavated areas.
Trenches and excavations can expose workers to structural hazards, such as collapsed walls or unstable supports. The site should be inspected regularly to minimize this risk, and proper shoring and bracing techniques should be used.
Workers can become exposed to hazardous gases and fumes in an excavation, especially in a confined space. To prevent this, workers should wear appropriate personal protective equipment and ensure adequate ventilation. Additionally, they should conduct a pre-excavation assessment and implement procedures for entering confined spaces in excavations, including testing the atmosphere, providing training on safe work practices, and having an attendant on standby to rescue workers if necessary.
Buried utility lines pose a significant hazard during excavations, as they can cause explosions or injuries if struck. To reduce this risk, site administrators should contact the local utility suppliers to learn the location of all existing underground utilities and have workers use vacuum excavation equipment where possible.
Excavated materials and construction equipment are hazardous to workers because they can fall into the trenches, blocking exits and causing suffocation. Additionally, they can damage or stop the water and gas lines running into a trench, creating a dangerous situation for workers. To avoid these risks, site supervisors should store materials away from the zone of influence plus 1 m of excavation and have workers walk to the edge of the trench to check for stability.
Structural failure is a common excavation risk that can lead to fatal injuries. It can occur when the walls or floor of an excavation collapses, burying or crushing workers beneath it. This accident can cause brain damage, broken limbs, suffocation, or death.
Soil conditions, design flaws, or faulty construction materials can cause the structural failure of an excavation. It can also result from natural hazards like seismic events, earthquakes, or volcanic eruptions.
Using good planning practices, PCBUs can reduce the risk of structural failure by understanding how their work could affect the ground’s stability and selecting appropriate control measures. This includes identifying and reviewing the health and safety risks, consulting with workers and upstream PCBUs, and conducting a thorough risk assessment.
When carrying out excavation work, PCBUs must consider the site’s specific characteristics, soil types, and any nearby buildings or services. They must also ensure that the excavation keeps those structures intact by shoring or benching the sides and that any underground services are adequately identified and protected.
Other control measures include providing adequate access and egress points. This includes ladders, stairs, or ramps that extend at least three feet above the excavation edge. Regularly checking that these access points are free from obstructions or damage is recommended. Workers should also be given comprehensive fall protection training to ensure they know how to use this equipment correctly.
Exposure to extreme temperatures can also be a danger for excavation workers. This can be caused by working in uninsulated trenches or by using power tools that generate vibration and heat. To prevent these risks, workers should be provided with suitable clothing and regularly check the temperature of their surroundings to avoid overheating or dehydration. They should also be encouraged to drink water and take breaks in a shaded or temperature-controlled area.
Objects falling from the sides of excavations can be a serious and sometimes fatal risk to workers. They can also damage the structure of trenches and cause suffocation and head trauma. This is a major reason why it is important to ensure workers stand clear of equipment when loading and unloading materials from trenchers, dump trucks, backhoe loaders, or other vehicles.
Unstable soil conditions are another hazard associated with excavation work. When shaky ground is excavated, it can collapse, causing the trench to cave in. These collapses are often deadly, burying or crushing people in the landslide path and leaving them with little or no chance to escape.
Underground services such as gas, water, electricity, sewerage, telecommunications, or other pipelines may be near an excavation site. PCBUs must take steps to identify and manage these services in the planning stage of an excavation project. Workers must also consider alternative methods of dewatering and pumping in areas where it is known or suspected that services are close by.
An atmosphere in an excavation can become hazardous when contaminants such as hydrogen sulfide gases or carbon monoxide build-up. In some cases, the air in an excavation can also become toxic from chemicals, fuel, or other substances used on the construction site. Supervisors must test the atmosphere in trenches and excavations deeper than 4 feet to determine if it is Immediately Dangerous To Life Or Health (IDLH). Various controls can be used to minimize these hazards, including ensuring that the excavation is benched, battered, or shored to support it, shoring the walls, and limiting access in the vicinity of the trench.
A hazardous atmosphere in an excavation can be caused by toxic fumes or lack of oxygen. This can cause poisoning, breathing difficulties, loss of consciousness, and even death. It can also result from a chemical reaction with substances at an excavation site, such as hydrogen sulfide gas released by sewer lines or carbon monoxide from running equipment.
Hazardous atmospheres can also occur naturally in areas with combustible gases, such as volcanic activity, or areas with high concentrations of harmful chemicals. Hazardous atmospheres can also be caused by work processes at an excavation, such as cutting with an oxy-acetylene torch or painting with flammable paints and solvents.
An excavator must test the air for hazardous atmospheres before workers enter any trench or excavation. If the air has a concentration of flammable gas, vapor, or mist above 10% of its lower explosive limit (LEL), it must be classified as a permit-required confined space.
The PCBU must also consider whether underground services are at the excavation site and contact the owner for advice before starting work. The PCBU must also ensure that all overhead services are connected or de-energized and that the excavation site is far from landfills, chemical plants, electricity lines, water pipelines, or gas pipes.
Identifying potential hazards before excavation work starts is essential, but it may only be possible to control some of these hazards. A good process for identifying hazards includes inspections by qualified persons, accident investigation analysis, and the use of safe work procedures. A hazard identification process should also include monitoring and record-keeping to update the information when conditions change. The workplace must be inspected regularly to check that controls are working effectively.
If a worker is struck by a large construction vehicle while working in an excavation, serious injury can result. This may include head trauma, brain damage, and broken bones. PCBUs should take steps to ensure that workers are safe from the risk of accidents involving vehicles. This includes limiting the number of workers working near construction vehicles, keeping them away from the sides of excavations, and ensuring that they are seated securely.
PCBUs should also provide adequate training for workers to understand how to operate the machinery and prevent accidents. They should also inspect the vehicles regularly to ensure they are in good condition and that workers follow the appropriate safety procedures when using them.
Workers should also be trained on properly using protective equipment to avoid being struck by moving equipment. They should also be informed of the risks associated with a particular type of excavation before work begins and be made aware of any other hazards they might face.
Finally, PCBUs should develop an emergency response plan to deal with any problems that might arise while workers are on site. This might include providing first aid and evacuating workers from the area. Moreover, PCBUs should ensure that all workers are properly supervised and have access to a supervisor. They should also check that their workers use appropriate shoring and avoid excavating near overhead or underground services. They should also regularly test the atmosphere in the excavation to identify any hazardous gases and ensure that corrective measures are implemented. Finally, they should provide adequate ventilation to remove dangerous gases, fumes, or vapors from the confined space.
How to Do Your Brick Repair
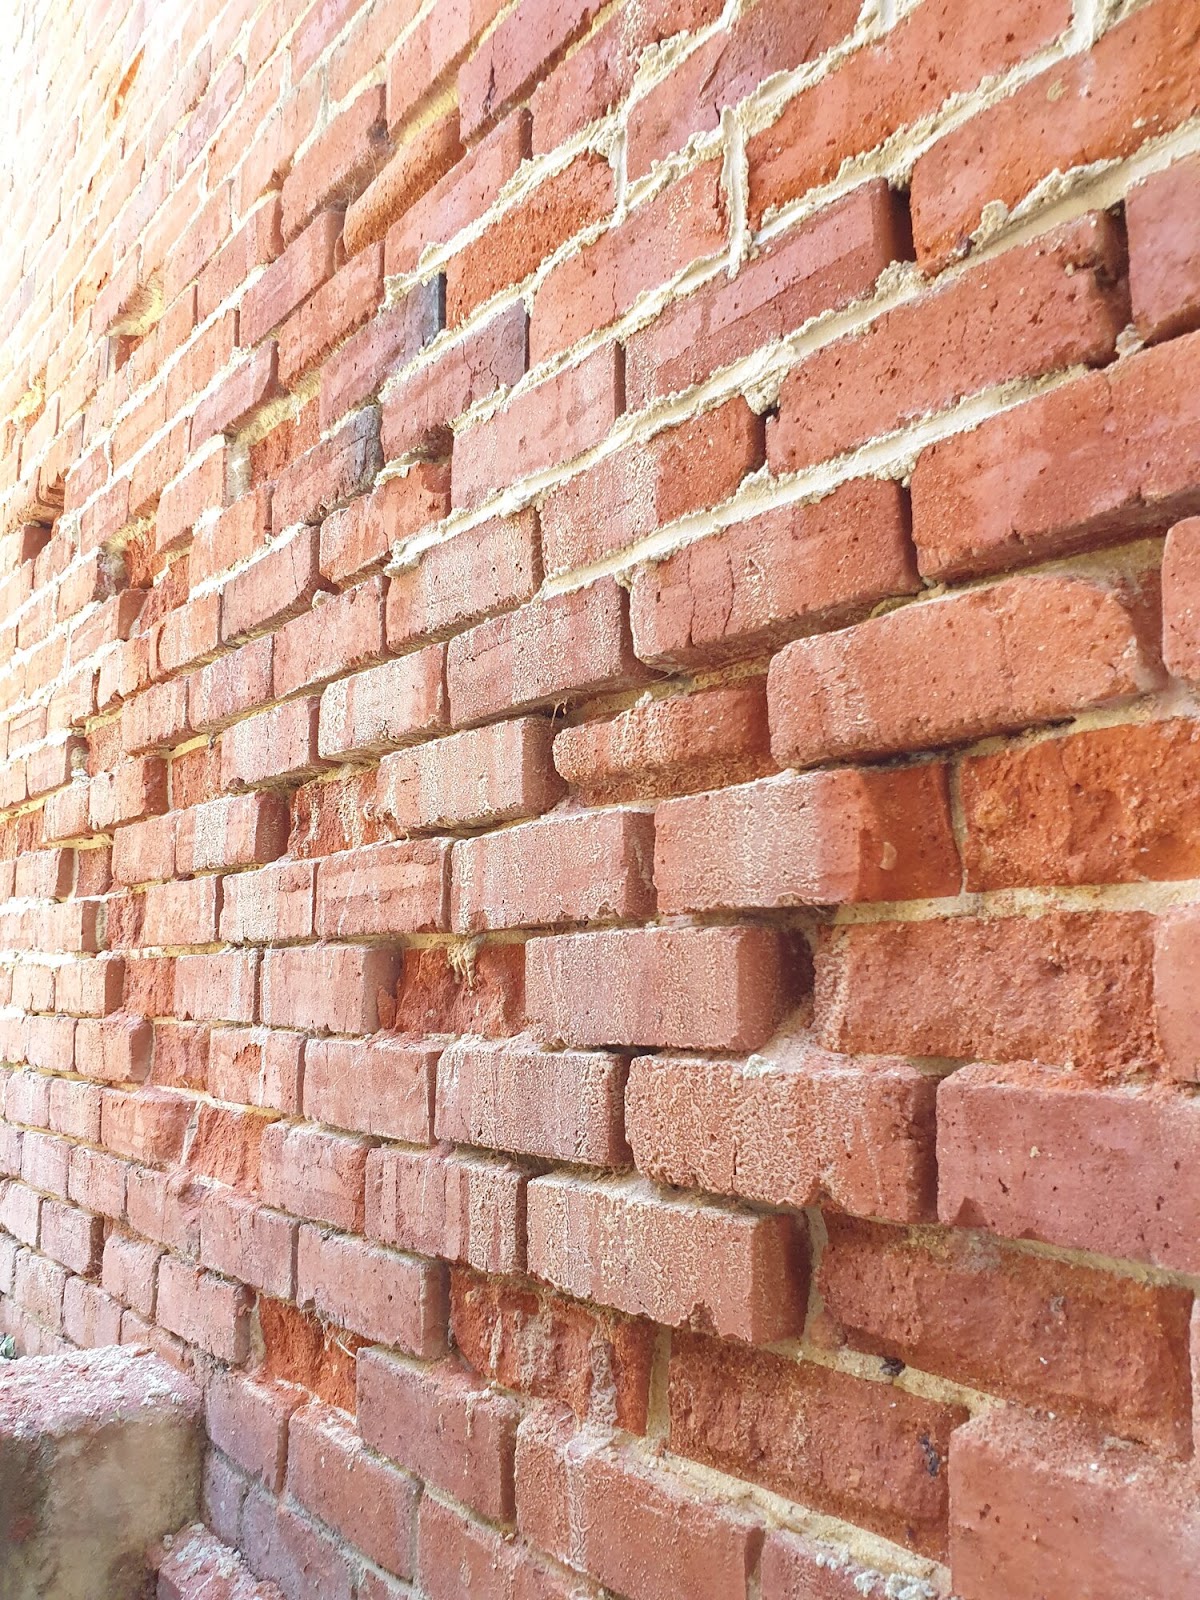
Brick repair can seem daunting, but it isn’t as complicated as it looks. With the right tools and a little bit of time, you can repair most brick walls yourself.
Begin by chipping away any broken or loose bricks. Save the chips for later, or use them to patch holes. Next, clean the wall to remove any dust or dirt. Go to https://www.bricklayerperthwa.com.au/ to learn more.
Repairing Cracks and Chips
Brick does not require as much maintenance as some other materials, but it is important to pay attention to cracks. When they appear, it is best to call in an expert to repair the cracks quickly so that water and other elements can not enter the brick materials causing further damage. Cracks can lead to serious structural issues and can also allow intruders like rodents, snakes, and insects into your home.
Brick repair can be accomplished through a process known as tuckpointing, which involves repairing the mortar joints in your brick wall. This is done by removing the old cracked mortar and replacing it with new mortar. The new mortar should be the same color and composition as the existing mortar in the brick wall, so the repaired areas blend in and look like they were never damaged.
Cracks in your brick walls can occur for a number of reasons, and they can happen at any time. Some are caused by natural elements like humidity, earthquakes, floods, and extreme heat that can cause movement in the brick. Sometimes these cracks are a result of foundation issues, or uneven settling, or they may be caused by tree roots growing too close to the brick wall.
Another common type of crack in brick is stair-shaped, and these are usually caused by rusted lintels. These stair-shaped cracks are most often seen on older homes, and they can be very dangerous to the structure of your house.
A professional can diagnose the problem, and determine if it is caused by rust, settlement, or other factors. Then they can recommend the most suitable course of action to correct the problem.
While some of the issues with brick are preventable, there will always be some things that can’t be prevented. But by paying attention to cracks and other issues, you can ensure that your brick wall stays in good condition for as long as possible.
Removing Broken Bricks
Bricks, like any other building material, need maintenance. Brick walls can look beautiful and add to a home’s strength, but deteriorating mortar joints make the structure less stable and create gaps where water can enter and cause more damage.
Brick repair, also called repointing, is the process of replacing old and crumbling mortar with new mortar. This is a relatively simple task and it is one that the average do-it-yourselfer can accomplish with the proper tools. Depending on the extent of the damage, however, it may be best to call in a professional brick restoration contractor.
The first step in any brick wall repair is to remove the broken bricks, and this can be done with a hammer drill and masonry bit. Once the holes are drilled, a chisel can be used to break apart the remaining pieces of brick. Be careful not to damage any of the surrounding mortar or brick faces, and work slowly so that you don’t accidentally chip away too much brick.
After the damaged bricks are removed, the hole is prepared for new mortar. The substrate should be slightly damp, and the area should be swept clean to remove any debris or loose dirt. Then, a trowel with the appropriate pointing mix is used to “butter” the bottom and sides of the replacement brick. This helps the mortar to adhere to the existing brick.
Mortar sets best in warm temperatures, so you should wait for a day when the weather is mild. Once the new mortar has set, a sponge can be used to wipe off any excess mortar and smooth it so that it blends in with the rest of the brick surface.
While bricks require less maintenance than many other materials, they do deteriorate over time. Whether it is due to moisture or simply wear and tear, a deteriorating brick wall can be unsightly and weaken the structure’s support. Brick repair is an inexpensive way to freshen up a home and keep it structurally sound.
An ounce of prevention is worth a pound of cure, and catching deteriorating brick issues early will save you money and stress in the long run. If you are concerned about the condition of your masonry, turn to a local masonry company like Turnbull Masonry for quality repair and brick restoration.
Filling Cracks and Chips
Bricks might seem like they’re built to last forever, but they can and do deteriorate in many ways. Weather, extreme temperature changes, freeze/thaw cycles and shifting soil can all cause damage to the masonry of a building. Often, this damage is in the form of cracks and chips. It’s important to address these issues as soon as possible, as they can turn into major structural problems if left unattended.
While the first step is to determine the severity of the cracks, it’s also a good idea to familiarize yourself with what can be done to repair them. Depending on the type of crack and its location in the wall, there are a few different options for how to proceed.
For isolated cracks and chips, a simple solution is to use a brick-repairing caulk or mortar repair mix to fill the area. It’s recommended that you wear goggles, gloves and a respiratory mask during this process to prevent cement or other debris from irritating your skin, eyes and lungs.
After assessing the size, direction and location of the cracked areas, it’s time to get to work. Once you’ve donned your safety gear, scrub the cracked areas with a stiff brush to remove any loose debris and dirt. This will help ensure a strong bond for the repair material of your choice.
Once the cracks are filled, you can use a trowel to smooth and blend the repair. If you can, it’s a good idea to use a mortar that matches the existing color and texture of your brick wall. Once the mortar is cured, you can consider adding a breathable sealant to the wall to keep moisture out and protect the brick from future damage.
It’s worth noting that, if you have cracks that run through several bricks, it’s probably best to call a professional. These types of cracks are usually caused by serious structural movement and can require re-laying the foundation or lintel. It may also be necessary to add support structures or ties in order to stop the movement. It’s important to talk to a qualified builder about the cause of the cracking and propose an effective remediation strategy.
Repairing Loose Bricks
A brick wall, chimney, walkway or paver patio looks beautiful when it’s intact and in good shape. However, loose or crumbling brick can create a safety hazard and may damage the overall structure of your home. It’s important to address brick and mortar problems as soon as they occur, as the damage can worsen quickly if left unattended.
Loose bricks can lead to water or ice penetration, which damages the integrity of the brick and causes the structure to fail. The damage can also increase the cost and time it takes to complete a project, as repairs can become more intensive or even require total replacement.
Typically, it’s a combination of age and movement that causes brick to crack or chip. This usually occurs around the corners and edges of a brick structure, as this area is exposed to more stresses. It is often possible to correct the problem by replacing the lintel or footing, but this is a complex and expensive repair.
The most common way to repair these issues is to replace the damaged mortar joints (also called tuckpointing). This process involves replacing the existing mortar in the cracked or chipped areas with fresh, new mortar. Tuckpointing can be a relatively simple and inexpensive way to repair a brick wall, chimney or sidewalk. It’s important to take the time to prepare the brick for tuckpointing, as failing to do so can result in a poor job that requires more extensive and costly repairs later on.
Before starting the tuckpointing process, it’s important to make sure you have all the necessary materials and tools. You’ll need a hammer and mason’s chisel, a wire brush or whisk broom to remove the remaining loose and broken brick, and a masonry trowel with a fine blade. It’s also a good idea to have a bucket of clean water available to mist the brick surface to keep it damp while you work.
Once you have your tools, start the tuckpointing process by first clearing away any loose or crumbling mortar from the gaps between the bricks. This can be done with a hammer and mason’s, a wire or a masonry grinder (if you’re careful to not go through the brick itself). Next, clean the gap of any dirt, dust or debris using a wire brush or whisk broom. Finally, mist the brick and mortar surface with water (this helps prevent the new mortar from drying too quickly).
Chain Link Fences
Chain Link Fences provide a great way to define the boundaries of your property. They are also great for keeping children and pets safely enclosed.

They are one of the most cost-effective fence options. However, they don’t offer as much in the way of increased property value as vinyl or wood fencing.
Chain link fences offer a number of security features that make them an excellent choice for commercial property. They can be built to a high height, and additional deterrents like barbed wire or razor tape can be added to the top to prevent climbing. They also provide excellent visibility, which can help discourage unwanted visitors and alert the public to your business property lines.
One of the biggest advantages of chain link fencing is its ability to be easily secured. The galvanized steel materials used in construction are virtually impossible to damage or destroy, and the protective PVC coating comes in a variety of colors and designs that can match your company’s brand image and blend in with the surrounding environment. Adding barbed wire or razor tape to the top of your chain-link fence is an effective deterrent against unwanted trespassers, and burying the bottom rail in the ground (12” or more) eliminates the possibility of forcing the fence up to crawl under it.
In addition, if vandalism or other damage does occur to your chain link fence, it’s easy to repair. Unlike other fencing materials, such as wood or vinyl, chain link fencing is made from modular sections that can be removed and replaced quickly. Depending on the amount of damage, your local fencing professionals can usually match your old section with an identical new one and have it repaired in no time.
Because chain link fences can be easily modified to fit your specific security needs, they’re a good choice for businesses that have to regularly change their locations or secure large industrial properties. They’re also a cost-effective option when compared to other fencing materials and can be used to create boundaries between your property and other buildings or roadways.
Lastly, with new regulations from the Department of Homeland Security requiring electric power, natural gas and water utilities to upgrade their perimeter protection, chain link fences can be an excellent solution. Adding barbed wire or razor tape, for example, can greatly enhance the safety of your facilities, while the open visibility of this type of fencing makes it easier for you to monitor your equipment and personnel.
Durability
Chain link fences offer a durable solution to property owners who want to keep people and animals off of their land. They are also a good choice for business owners who want to prevent theft and vandalism. They are highly cost-efficient, and they can withstand a lot of punishment without breaking or warping. They do not require staining, repainting or waterproofing, and they can withstand the elements, including snow and rain.
They are easy to maintain, requiring only regular visual inspections and periodic cleaning. Typically, just a hose down is enough to clean the fence and remove built-up dirt or debris. However, if the fence needs more substantial cleaning, you can use soapy water or a power washer to remove any grime that has developed over time.
These types of fences are very versatile and can be customized to meet the unique requirements of your property. They can be constructed to provide maximum security for large industrial sites, or they can be used to secure small commercial properties and prevent unwanted access. It is important to identify the specific needs of your property in order to select the appropriate height and mesh size for your chain link fence.
The metal construction of chain-link fencing provides ample protection against the elements. The fence is durable enough to withstand heavy rain and snow, and it does not need to be stained or repainted. It is also resistant to rust, which can save you money in the long run. Additionally, a chain-link fence is strong enough to keep animals and children safely contained.
This type of fence is ideal for businesses that have limited space and cannot afford to install a taller fence. It can also be used to protect valuable equipment and machinery from damage. These fences are also available in various sizes, allowing you to customize them to meet your specific needs.
A chain-link fence is not as visually appealing as a wooden or vinyl option, but it offers a number of benefits that make it an excellent choice for business owners. It is relatively inexpensive, and it can be customized to suit your business’s needs.
Low Maintenance
One of the biggest benefits of chain link fences is that they require very little maintenance, especially when compared to other fencing materials. This makes them a great choice for busy businesses and homeowners alike who need a reliable fence but don’t have a lot of time to dedicate to it. Typically, the only thing that needs to be done to a chain link fence is to check it for signs of wear and tear or damage on a regular basis. If any issues are spotted, they should be dealt with right away to prevent any kind of long-term problems from developing.
Another important feature of chain link fences is that they’re very affordable, which makes them a great option for budget-conscious business owners and homeowners. They’re also much easier to install than other fencing materials, which can be a huge benefit for those who are working with limited space or have a very tight deadline to meet.
Lastly, chain link fences are very versatile and can be used in a variety of applications. They’re often seen at sports arenas and tennis courts, but they can also be used to enclose homes or businesses, protect children or pets, or even act as a barrier for parking lots and alleyways.
One of the biggest negatives of a chain link fence is that it’s easy to see through, which can make it less private than some other fencing options. However, this can be easily remedied by adding a screen or covering to the areas of the fence that you want to be more opaque.
When it comes to repairs on a chain link fence, some of the simplest are straightening bent rails and repairing broken wire mesh. To straighten a bent rail, simply cut a new piece of fence railing that is the same length as the old one, then attach it to the end of the existing line post with a rail coupling. From there, just use pliers to fix the ties, and you’ll have your fence back in shape!
Versatility
Chain link fences are one of the most versatile fencing options available. They provide security, visibility and scalability that make them a great option for both commercial and residential use. They can be used to secure homes, enclose yards and recreational areas, or deter crime and trespassing. In addition, homeowners can improve the aesthetics of their property with privacy features, such as vinyl slats that can be inserted into the mesh.
Another advantage of chain link fences is that they can be easily repaired, especially when a section is damaged. Since the individual wires are woven together, a professional can repair only the affected area without having to replace the entire fence. The fact that these fences are made of metal also makes them more resistant to vandalism and other types of damage.
The cost of a chain-link fence can vary depending on the size, material, and installation process. Regardless of the specific details, these fences are generally affordable and offer a high return on investment. Furthermore, compared to other fencing materials, they are relatively inexpensive and easy to install.
Moreover, they can be customized to meet specific needs and requirements. For instance, a business owner can use a chain link fence to separate designated areas of their premises where hazardous materials are stored or heavy machinery is operated. This can enhance employee safety by preventing unauthorized access and promoting adherence to safety protocols.
When installing a chain-link fence, it is important to plan ahead and choose the right height. This will ensure that the fence is sturdy enough to keep out intruders and provide privacy for residents. It is also a good idea to consider the location of the fence, including its proximity to the street and other buildings. Lastly, it is important to plan the positioning of gate posts.
Once the ground has been dug and the concrete footings are set, it is time to place the terminal posts. These are the end, corner and gate posts that will take the strain of the tensioned line wires. Ideally, these should be placed at no more than 69m apart. There are two types of post, namely angle iron and concrete, and both should be securely embedded in the ground. If the concrete post is used, it should be reinforced with steel to ensure maximum strength.
Roofing Cost Factors
Having an updated, sturdy roof is an excellent return on investment for homeowners. Not only does it protect the home from wind, rain, and snow, but also makes the home more attractive to potential buyers.
However, re-roofing projects come with expenses and they can be costly. Some factors to consider are the waste factor, roof size, and roofing material. Make sure to hire professional Roofers Longview TX for your project.
Roofing is an essential aspect of any building, providing protection from the elements and ensuring the structural integrity of the property. However, the cost of roofing can vary significantly depending on various factors. Here are some key factors that influence roofing costs:
- Roof size: The size of the roof is one of the primary factors that determine the overall cost. Larger roofs require more materials and labor, resulting in higher costs. Additionally, complex roof designs with multiple angles and slopes can also increase the cost due to the additional time and effort required for installation.
- Material selection: The type of roofing material chosen has a significant impact on the cost. Common roofing materials include asphalt shingles, metal, tile, and slate. Each material has its price range, with asphalt shingles generally being the most affordable and slate being the most expensive.
- Roof pitch: The pitch or slope of the roof can affect the cost of installation. Steeper roofs are more challenging to work on and require additional safety measures, which can increase labor costs.
- Roofing permits and regulations: Depending on your location, you may need to obtain permits and adhere to specific regulations for roofing projects. These additional costs can vary depending on the area and the complexity of the project.
- Existing roof condition: If the existing roof needs repairs or removal before installing a new one, it can add to the overall cost. Additional work, such as replacing damaged decking or fixing leaks, will increase the labor and material expenses.
- Labor costs: The cost of labor can vary depending on the location and the experience of the roofing contractor. It is essential to hire a reputable and experienced professional to ensure quality workmanship.
Material
The material used to cover a roof is a major factor in the overall project cost. The options available to homeowners are vast, with each type offering a unique set of benefits and features. Some are better suited for extreme climates than others, while some have special qualities that help with energy efficiency. Choosing the right roofing material can significantly impact your project’s cost and timeline.
The most common roofing materials are asphalt shingles, wood shakes, and slate tiles. These are relatively inexpensive, but they don’t last as long as metal roofs. Other options include concrete, stone, and terra-cotta tiles, which offer superior durability and longevity. The choice of roofing material can also influence the final aesthetic of a building, which may impact its value if you plan to sell in the future.
Additional roofing accessories and upgrades can also impact the total cost. For example, solar shingles and solar photovoltaic panels add to the initial installation costs, but they can save money on energy bills over time. Similarly, the length and scope of a warranty or guarantee may increase the upfront cost but can provide peace of mind and potential savings down the road.
Pitch
The pitch of your roof is one of the most important factors in roofing costs. Pitch is a measurement of how steep and uneven your roof is, and it influences many different elements of your home. For example, a very steep roof will need to have more materials than a flatter roof, and it may also need additional support structures. The pitch of your roof also affects how easily snow and rain can drain from it.
Several different factors influence roof pitch, including your home’s design and shape, its location, and the condition of the existing roof. In addition, the amount of sun exposure your roof receives and the type of shingles you choose can affect the pitch.
Many people confuse roof pitch with roof slope, but they are not the same thing. While the slope is a comparison between the roof’s rise and its run, pitch uses measurements based on the entire roof span.
The most common way to express roof pitch is by using a division slash – such as 5/12 or 8/12 – or a colon, such as 2:12 or 7:12. Either way, the number indicates a ratio between two numbers, and the numerator and denominator work together to tell you the pitch of your roof.
A high roof pitch is often necessary for drainage and durability, but it can also raise your roofing costs. A steep roof is more difficult to walk on, and it can require more safety measures, staging, and labor to complete. This can add up quickly, especially for a large home with a high-pitched roof.
A roof’s pitch is also important because it determines which roofing materials are best suited for your home. For instance, a flat roof needs a simpler calculation of width times length than a steeper roof, which must factor in the extra material needed to cover the increased surface area. The roofing industry has tables for each roof pitch that can help you and your contractor calculate how much extra materials to order. This helps ensure that you get the right amount of materials, and it prevents costly overage.
Accessibility
Accessibility is about ensuring that everyone can use products, services, and environments. This can be done through physical adjustments to spaces, such as ramps, and also through digital platforms, such as websites. This includes people with blindness, deafness, or mobility impairments, as well as those who have cognitive or cognitive processing challenges.
There are many benefits of accessibility. For businesses, it can lead to new customers. It can also reduce the risk of lawsuits. In addition, it can help companies comply with government regulations. For example, Section 508 of the Rehabilitation Act requires that federal agencies provide accessible content on their websites. This can be costly for businesses that do not have an accessible website. Therefore, businesses need to invest in accessibility.
Another benefit of accessibility is that it can help people maintain their independence. For example, people with visual disabilities can have difficulty navigating websites, using social media, or reading printed materials. It is important to make these digital resources as accessible as possible by providing alternative text for images, high contrast between text and background, and audio descriptions of videos. In addition, people with cognitive impairments can use assistive technologies, such as screen readers or head pointers, to navigate the web. These tools can make it easier to interact with web content and increase productivity.
In the country, accessibility is a legal requirement for most federal and state agencies. In addition, private companies must adhere to the state laws governing disability accommodations. For example, an employer may need to provide a sign language interpreter for meetings or a voice-recognition software application for email correspondence. These accommodations are known as reasonable accommodations and are intended to allow workers with disabilities to participate in the workplace and function effectively. In addition, these accommodations can be cost-effective for businesses. In general, the more proactive a company is in making its services and products accessible, the less time and money it will spend accommodating requests later on. For this reason, it is best to think about accessibility early in the design process.
Penetration
Penetrations in roofing create breaks in the roof membrane and deck, and they are one of the main sources of leaks. In addition to exposing the structure to weather and insects, leaky penetrations can result in catastrophic structural damage, and cause mold or mildew. This is why careful planning, detailing, and installation are required for all roof penetrations.
Some examples of roof penetrations include soil vent pipes, hot pipes from boiler flues and log burners, kitchen and bathroom vents, skylights, chimneys, extraction ducting, electrical cables, solar panels, and roof tracks for mechanical window cleaning systems. These can all be fixed to either a flat or a pitched roof, but they require careful planning and detailing to ensure they are safely sealed and have sufficient ventilation.
If a pipe or flue penetrates through the roof, it must be properly flashed and sealed to the roof, otherwise, a leak will develop. There are various ways to flash a penetration, but the best way is to use spray foam. It is much easier to apply than a sheet good, and it can be applied to the entire surface of the roof, unlike other forms of flashing.
All commercial pipe and flue penetrations must be assessed before re-roofing to make sure they are not located in a position that will interfere with the free flow of rainwater over the roof. Large penetrations should not be located on a ridge or panel seam, as this can block the valleys (or pans) and prevent rainwater from draining away from the penetration in a uniform manner to the eaves.
Larger penetrations usually require a curb to be built up at the point where the penetration is cut into the roof. This can add to the overall cost of a project, as it requires additional materials, time, and labor. However, this is often the only option when a building needs to accommodate a specific equipment requirement.
In conclusion, several factors influence the cost of roofing. It is crucial to consider these factors when budgeting for a roofing project to ensure accurate cost estimation and a successful outcome.
Types of Schematic Drawings Used in Electrical Wiring
Your Home Solutions involves transferring electricity through conductors. Whether you’re installing a circuit for lights, switches, or receptacles, many types of wire have different voltage and amperage ratings.

Electric wires are typically insulated and colored. This makes them easy to identify. Each color represents a specific purpose. For example, black wires carry current from a panel and power light bulbs or appliances.
An electrical single-line diagram (SLD) is a schematic drawing showing the power distribution path from an incoming power source to each downstream load. It also shows the power ratings and size of the circuit conductors and protection devices. It is an important tool in electrical engineering but often needs to be noticed. Several industrial facilities need an accurate SLD or even one.
Understanding an electrical single-line diagram helps to know the different symbols used. Using the right characters can make your charts look more professional and easier to read. Knowing the electrical wire types and their color coding is also helpful. Understanding these things can help you save time for an electrical wiring project.
Typically, a single-line diagram is a form of the block diagram. It depicts the paths for power flow between different entities of a system. Electrical engineering professionals use it to determine the best way to distribute power in a system. It also allows them to track the voltages in the circuit and ensure safety.
This diagram is an excellent way to identify the various types of equipment and their connections in a system. It can be used as a reference for all future testing, maintenance, and troubleshooting activities. Moreover, an accurate single-line diagram can also be used to calculate the short-circuit currents and determine selective protection coordination. It is important to note that a single-line diagram should be updated to keep it current.
When interpreting a single-line diagram, starting with the highest voltage and working your way down is important. This will help you avoid mistakes leading to a fire or other dangerous situations. Also, follow all local codes and ordinances when working on a home electrical wiring project. Following these rules can save money if a home inspector catches it.
While there are many different ways to draw an electrical diagram, the single-line diagram is one of the most commonly used. It is a basic electrical schematic that includes all the major components of an electric installation. It consists of a set of symbols and represents the main function of each element. This is a good starting point for new electricians, providing a clear and easy-to-understand installation overview.
Block diagrams are used in many areas of engineering, including electrical wiring. They are an important part of the design process and help engineers communicate their ideas to their coworkers. These diagrams show the relationships between system parts, such as a circuit or software. The charts can also illustrate the flow of data within a system. These diagrams represent how components are connected and work together and can be easily understood by people with no prior engineering experience.
The block diagram is one of three types most often used in an electronic system. The other two are the one-line diagram and the elementary diagram. These diagrams follow an order from very broad to very specific and are meant to simplify the work of a professional technician or hobbyist working on a project. By understanding the differences between these diagrams, technicians can be more efficient in their work. They can quickly isolate problems, trace them with a one-line diagram, and then repair them with a wiring diagram.
A block diagram can be created in any VI in LabVIEW by selecting the Create>>Block Diagram menu item from the Tools palette or clicking the New VI icon on the toolbar. Once a block diagram is opened, it can contain objects such as terminals, subVIs, functions, constants, and front panel indicators. The object names in a block diagram are defined by their appearance on the front panel and in the Tools palette. Alternatively, you can use the text box in the Block Diagram toolbar to enter names for objects and their locations.
Adding documentation to your block diagram is simple. You can place comments in the text box or add a free label to any location on the chart. You can also set a subdiagram label or an event structure on the diagram. These labels can document behavior that is not obvious from the chart’s context (such as “This For Loop iterates over every element in an array”).
When creating a block diagram, use standard UML symbols and accurate labeling. It’s important to be able to read your chart, so you should color-code different components and use standardized characters for things such as diodes, resistors, controlled switches, and AC sources. Labeling the input and output terminals of each element is also helpful. This will make it easy to identify the correct wires to connect from each device to the power supply.
A wiring diagram is a graphical representation of electrical connections. It consists of basic shapes such as circles, rectangles, squares, and lines representing wires. The lines may be horizontal, vertical, or diagonal. They may also be labeled or numbered for clarity. The main goal of a wiring diagram is to provide information about the interconnections of different electrical components. It can help less experienced people understand the connection between various circuit parts.
A block diagram is the simplest form of an electrical wiring diagram. It consists of blocks representing each component and lines showing their relation to each other. It is more detailed than a schematic diagram, but it is still a good way to start an electrical project. If you are looking for a detailed electrical wiring diagram, you can use a free online software program called EdrawMax. This program allows you to draw wiring diagrams with different templates and symbols. You can also create your own custom symbols and labels with this program.
The wiring diagram is a key part of any electrical project. It helps to make sure all the components are connected correctly and that they are working properly. It will also help to identify potential problems before they become dangerous. Having an electrical wiring diagram will help you save time and money. It will also reduce the risk of error when performing an electrical project.
When making a wiring diagram, following the guidelines for the specific type of device you are working with is important. For example, if you are wiring a switch, receptacle, or light fixture, using the correct wire color for each connection is important. This will help prevent errors and ensure the safety of your home or workplace.
A wire can be labeled with one of the following colors: BLACK = HOT. This wire carries current from the power source to the device. WHITE = NEUTRAL. This wire has current back to the power source or a breaker. GROUND = GROUND. This wire is connected to your home or business’s grounding system, providing a path for fault currents to return to their source.
A circuit diagram is a wiring schematic that illustrates the connections between electronic components. It uses a combination of images or standard symbols to represent different parts of the circuit. These circuit diagrams are used in the design and construction of electrical equipment. They can also troubleshoot electronic devices that may not work properly.
An electrical circuit is a closed path through which electricity flows from the power supply to a device or apparatus. This electricity then returns to the power source through a neutral wire. The circuit may include switches, receptacles, junction boxes, and light fixtures. The wiring of these elements should follow a specific sequence to ensure the safety and proper functioning of the system.
The first step in the electrical wiring is selecting the appropriate materials and tools. This includes choosing the right conductors and cables for the job and determining their size and gauge. The conductors can be single solid or stranded wires, with stranded conductors preferred for flexible and durable connections. The next step is preparing the cables and connectors for installation. This includes stripping the sheaths, removing excess insulation, and cutting the cable to the correct length. It is important to use the right size of wires and connectors for each connection, as oversizing or undersizing them can cause dangerous short circuits and fires.
After preparing the cables and connectors, the next step is connecting them to the corresponding terminals on the circuit board. This can be done by using screwdrivers or electrical tape. After the connection is complete, the circuit board should be tested to ensure it works properly and has no defects or damage.
Finally, a licensed electrician must inspect the completed circuit to ensure it is safe for operation. The electrician will check for faulty or damaged components and repair them as necessary.
In addition to the above steps, it is also essential to understand the color code for electrical wires. Each wire has a specific color that indicates its purpose in the circuit. The color codes are established by central authorities to ensure uniformity and ease of application for technicians. The colors are also a good reminder to prevent accidental contact between live and neutral wires, which can lead to a potential fire hazard or shock.
The Basics of Plumbing
Many plumbing issues can be handled with DIY solutions, but some require immediate attention. These situations usually involve significant damage, health hazards, or disruption to your daily routine. If you’re faced with a plumbing emergency, keep your cool and follow these steps. Start by finding a local 24/7 plumber and keeping their number handy. You can visit this website at https://www.platinumplumbingsbc.com/ to learn more.
1. Call a Plumber

A plumber is a skilled professional that specialises in the installation, repair and maintenance of pipes and fixtures in residential and commercial properties. Their duties include inspecting and testing water pressure, repairing leaks, unclogging drains and toilets, fitting new taps and appliances, installing gas lines and more. Plumbers also have to be knowledgeable about building codes, regulations and safety issues when working on plumbing projects.
While there are some minor issues that can be fixed by homeowners, a professional plumber is always the best option when it comes to serious problems. Even a small leak can lead to extensive damage and costly repairs if left untreated, and even something as simple as a persistent clog could be the sign of a larger problem. If you notice any of the signs that a plumbing disaster is imminent, it’s important to act fast.
It’s tempting to try and fix your own plumbing problems, but this is rarely a good idea, especially during an emergency. In most cases, trying to fix a problem yourself will only make things worse and may even cause further damage to your home or property. Furthermore, attempting to fix a plumbing issue without the proper tools or knowledge can be dangerous.
Having an emergency plumber on speed dial is the best way to ensure that you’re prepared for any situation that arises. Plumbers are available 24/7 and can handle everything from leaking taps to flooding basements. In addition, having a plumber on call can save you money and stress in the long run by ensuring that your plumbing issues are resolved quickly and efficiently.
Before calling your emergency plumber, it’s a good idea to document the damage and any other pertinent information. This will help your plumber assess the situation and determine the best course of action. Be sure to note any electrical hazards, like exposed wires or outlets near water, as well. It’s also a good idea to turn off any water sources, such as the main water valve, in order to prevent further damage or flooding. Finally, take a look around the area and note any other symptoms of a plumbing problem, such as wet spots on the floor or walls.
2. Turn Off the Water
Whether you’re about to tackle a plumbing repair project or just want to minimize your water usage, it’s important to know where and how to shut off your home’s water supply. This will help you avoid expensive damage and keep your family safe until a plumber arrives to fix the problem.
Shut off valves are typically located on the interior side of the water meter, near your home’s foundation. You may also find them under sinks, behind appliances like your refrigerator and washing machine, or at the spigot outside of your home. If you’re having trouble finding the valve, check the walls in your basement for signs of the meter or the main water line entering your house. It’s often a simple knob or lever that needs to be turned clockwise to shut off the water. If you’re not sure which direction to turn it, try opening a faucet on the lowest level of your home (such as a basement or foundation-level outdoor faucet) and then closing it to see which way the water flow stops.
Then, look for two chrome-plated shut off valves under your sink—one for hot and one for cold water. These are connected to the water supply tubes, and they’re easy to locate and turn off. Just make sure to turn them both off!
If you have a leaky faucet or toilet, it’s a good idea to turn off the water to that fixture right away. This will allow you to continue using other faucets and appliances until the problem is fixed. Plus, you’ll be able to save money on your water bill!
In addition to knowing how to shut off your home’s water, it’s a good idea to have regular professional inspections. A licensed plumber will be able to identify potential issues, provide preventative maintenance, and offer expert advice on how to keep your plumbing working well for years to come. For example, a plumber can advise you on what products are safe to use in your pipes and how to avoid common mistakes that can cause costly repairs.
3. Take a Look Around
Whether you are building a new home or just fixing up an old one, plumbing is an important part of the process. If you understand the basics of how it works, you can save yourself a lot of time and trouble.
Plumbing is the system of pipes and fixtures that convey water, waste, or both inside a structure. It includes everything from the water supply and sewage systems to showers, bathtubs, toilets, and faucets. The term “plumbing” is derived from the Latin word for lead (plumbum) since early water piping was often made of that material.
Plumbers are responsible for the installation, repair, and maintenance of these vital parts of a home or building. They follow strict regulations and codes to ensure the safety of their clients. In addition to installing and repairing pipes and fixtures, plumbers also test water for safety and quality.
A plumber’s job can be dangerous at times, but it is an exciting and rewarding career for those who love working with their hands. It’s not a trade for the faint of heart, but anyone with the right mix of skills and knowledge can be successful as a plumber. These examples are automatically selected and do not reflect the opinions of Merriam-Webster or its editors.
4. Clean Up
Plumbing is a complex system that provides clean water for use in homes and buildings, while also disposing of waste and sewage. It requires a great deal of knowledge and manual dexterity to install, maintain and repair. It also involves a number of other skills, such as analytical thinking and interpersonal communication. This makes it a difficult profession to master, but those who do are well-rewarded with a good salary and career prospects.
In order to become a plumber, it is necessary to complete an education or training program. This can be an associate’s degree or a vocational school course that covers all aspects of plumbing. It is also common to have an apprenticeship, which is a hands-on training program that takes anywhere from two to five years. This is a great way to learn the trade and make sure you are prepared for what lies ahead.
It is possible to avoid plumbing problems by following some simple steps. For example, it is important to never flush paper towels, cloth diapers or feminine products down the drain. These items take a long time to break down and can cause clogs. It is also helpful to clean the drains regularly by pouring a mixture of baking soda and vinegar down the drain. This will help to break up any clogs and remove bad odors.
If you do experience a sewage backup, it is important to call in professionals. Doing this will ensure that the sewage is removed and that your home is properly cleaned and sanitized. It is also important to not try to clean the sewage spill yourself, as this could damage your property and potentially affect your insurance claim.
Plumbers can be a useful part of any household or business, but it is important to find one that you can trust. There are plenty of scammers out there, so it is vital to do your research before hiring one. If you are looking for a plumber, be sure to ask about their previous work and their cleaning habits. While it may seem that plumbers have a negative stigma, it is important to remember that there are many honest and trustworthy ones out there.
How to Choose a Bath Design and Remodeling Contractor

When homeowners hire a contractor to remodel their bathroom, they need a pro with the right experience and skills. Changing the layout, hanging new drywall and installing a new tub or shower are major structural changes that shouldn’t be left to beginners.
Homeowners should start by gathering recommendations from friends and family. They should also ask contractors for photos of previous projects that fit their design aesthetic and ask about the project’s estimated timeline and budget.
Whether you’re looking for a modern look or a more traditional style
Bathroom remodeling is an excellent way to add value to your home and update the aesthetic. But before hiring a contractor, make sure you have a clear idea of what you want to accomplish. A good contractor will be a great communicator and planner, and they’ll help you develop your vision into a well-executed project that fits within a set timeline.
If you’re not sure where to start, consider hiring a design firm or interior designer who specializes in baths. They can create a plan for the space that will allow you to see what your finished bathroom will look like and offer suggestions on how to achieve it. They can also advise on what materials are most cost-effective and what will work best with your existing plumbing.
You should also consider whether you’re willing to use green products and if you need to relocate or install new plumbing fixtures. This will affect the final price of your project. Using sustainably-sourced materials is a great option, but you should also keep in mind that it will take longer to obtain these products and may increase the overall cost of your remodel.
A reputable bathroom remodeling company will provide you with a written contract that details the project, costs and schedule. It should also include any special requests you’ve made, such as reusing certain materials or a specific color scheme.
Whether you’re looking to add value to your home
Bathroom remodeling is one of the best ways to add value to your home. A high-quality remodel will brighten the room, improve functionality and boost resale value. However, it’s important to find the right contractor for your job. Here are some tips to help you make the best choice:
Ask for Recommendations
It’s a good idea to start by asking for recommendations from family members, friends and neighbors. This will give you a chance to hear about their experiences with the contractor and how happy they were with the results of the project. Online reviews are also a useful tool for getting a sense of the contractor’s reputation.
When interviewing potential contractors, ask for a portfolio of previous jobs. This will help you determine if the contractor’s style and aesthetic match your own. You should also ask about their process, timeframes and pricing estimates.
Be sure to ask the contractor whether they will provide a written contract for the bathroom remodel. This will protect both parties in case anything goes wrong during the project. In addition, it will outline the specifics of the project, including the price, payment schedule and work site address. The contract should also include a statement that the contractor is licensed and insured. This is a good sign that they take their work seriously and want to protect their customers.
Whether you’re looking to add storage space
When homeowners hire a bathroom remodeling contractor, they want someone who will listen carefully to their ideas and then translate those into the finished project within an agreed-upon timeframe and budget. A good contractor is a skilled communicator, planner, problem-solver and project manager. They also work with other professionals, including architects and interior designers, to create a design that meets the client’s unique needs and aesthetic preferences.
The right bathroom remodeling contractor will be able to provide a cost estimate upfront and give an idea of how long the project is likely to take. They should also have a portfolio of previous jobs and references that confirm their reliability and quality of work. If they aren’t willing to supply these details, it could be a red flag.
Homeowners should also ask the contractor if they have experience with specialized tasks, like plumbing and electrical. These specialized skills require certifications that the average contractor may not have. It’s also a good idea to check whether the contractor is licensed and insured. This will protect the homeowner if something goes wrong with the remodel. In addition, it’s important to find out whether the contractor will clean up after themselves. If the bathroom is going to be undergoing any demolition, this is especially crucial. Asking the contractor about this in advance will prevent the homeowner from being stuck with an unsightly mess.
Whether you’re looking to create a more functional layout
Bathroom remodeling can be one of the most satisfying home improvement projects, enhancing your quality of life and increasing your home’s resale value. However, it is essential to choose a contractor that is reputable and knowledgeable to ensure your project is completed within an agreed timeframe, budget, and style. It’s a good idea to contact several contractors before choosing the best fit. Be sure to ask each contractor questions, and request references from past clients. The best contractors will be able to answer your questions and provide a detailed proposal that includes an estimate for all aspects of the remodel, including any demolition work.
When considering a bathroom remodeling contractor, look for an experienced pro with the proper credentials and a portfolio of impressive projects. They should also carry the right licensing and insurance, and be able to meet your specific needs. A good contractor will listen to your goals, understand your aesthetic preferences, and be able to translate your vision into a realistic design within an agreed timeline and budget.
A skilled tile professional can create a beautiful and functional bathroom with new tiles, countertops, or even a custom shower. A cabinet pro will be able to install new cabinets, or work with your cabinet supplier to create an ideal layout for your space. And a carpenter will be able to build and install custom vanities or a pre-made product, and add finishing touches like heated floors or built-in speakers.